Mastering the Art of Self-Braiding: Your Ultimate Guide on How to French Braid Your Own Hair
The French braid stands as a timeless and elegant hairstyle, revered for its polished appearance, incredible versatility, and practical benefits. Whether you're seeking a sophisticated look for a special occasion or a secure style to keep your hair neatly tucked away during a busy day, learning how to French braid your own hair is an invaluable skill. Often perceived as complex, the truth is that with a clear, step-by-step guide and a little practice, this impressive woven plait is surprisingly accessible to everyone, regardless of hair length or texture.
From long, flowing locks to chic bobs, from kinky-curly textures to fine, straight strands, a French braid can flatter every hair type. Beyond its aesthetic appeal, it also serves as a fantastic protective style, helping to maintain hair health by minimizing tangles and exposure to environmental stressors. This comprehensive guide will break down the process, offering expert tips and actionable advice to help you confidently create beautiful French braids on yourself and earn major compliments. Let's unlock the secret to this classic hairstyle together!
Prepping Your Hair for the Perfect Braid
Before you even think about weaving strands, proper hair preparation is key to a successful and long-lasting French braid. A little upfront effort can make all the difference, especially when you're learning how to French braid your own hair.
- Detangle Thoroughly: Start with completely detangled hair. Knots and snags will only make the braiding process frustrating and can lead to uneven results. A wide-tooth comb or a detangling brush is your best friend here.
- Product Power-Up: The right products can transform your braiding experience.
- For Smoothness and Grip: Apply a small amount of leave-in conditioner, mousse, or a texturizing spray. This helps to smooth out strands, reduce flyaways, and, crucially, add a bit of grip, making the hair easier to hold and guide. This step is particularly important for those with fine or super-sleek hair, as it prevents strands from slipping through your fingers.
- Targeted Application: Hair expert Robin Groover advises that the length of your braid influences where to focus your product. For shorter braids, concentrate product near the roots and top sections to prevent unraveling. For longer braids, pay attention to the ends to protect them and prevent splitting.
- Working with "Day-Old" Hair: While not a strict rule, many find that hair that hasn't been freshly washed (i.e., "day-old" hair) offers better grip than super-slippery, shampoo-day hair. If your hair is too clean, a little dry shampoo or texture spray at the roots can add the necessary friction.
- Curly and Coily Hair Considerations: If you have tight curly or coily hair, blowing your hair out before braiding can simplify the process by reducing shrinkage and making the strands more manageable. However, it's certainly not a requirement. Many achieve stunning French braids on natural textures. If you choose not to blow out, ensure your hair is well-moisturized and detangled, and consider working with slightly damp hair to enhance elasticity and control.
Choosing Your French Braid Style: Single vs. Double and Beyond
The beauty of the French braid lies in its adaptability. Before you begin, decide on the number of braids you want, as this will dictate your starting point and the overall look.
- Single French Braid: For a classic, elegant single braid that runs down the back of your head, you'll start by taking a section of hair from the top, extending from your forehead to the crown. This is the simplest starting point when learning how to French braid your own hair.
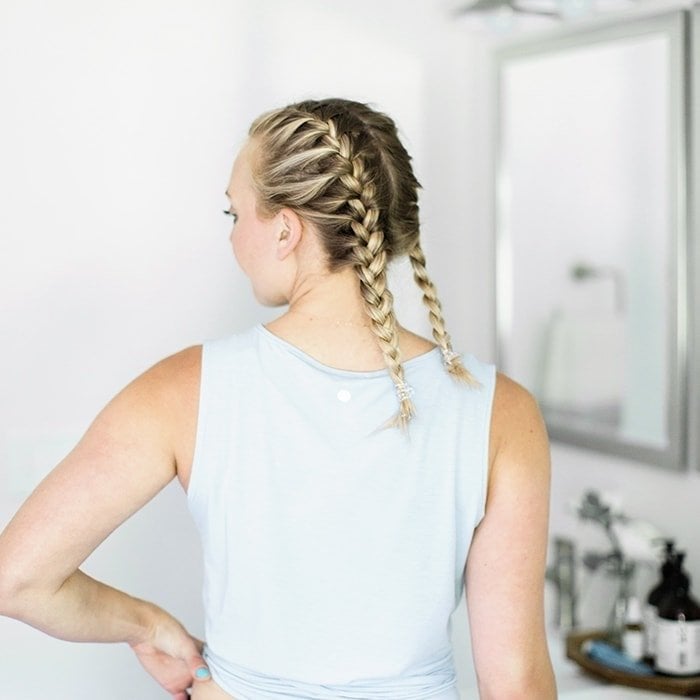
- Double French Braids (Pigtails): If you're aiming for two braids, often called "pigtail" French braids, you'll need to part your hair first. You can create a sharp middle part for a symmetrical look or a low side part for a more playful, asymmetrical vibe. Once parted, work on one side at a time, treating each section as an individual braid. Hair expert Robin Groover recommends tracing your part with a bit of gel or edge control for a super sharp, detailed finish and added shine – a pro tip for perfect grip and parts.
- Braid Size Matters: The size of your braids significantly impacts the final aesthetic. Groover explains, "Large braids give a fuller look; small to medium braids are tighter and have less frizz." Experiment to find what best suits your hair type and desired style.
The Step-by-Step French Braid Technique
Now for the main event! This detailed breakdown will guide your hands as you learn how to French braid your own hair. Remember, consistency in your hand movements and tension is key.
- Start with Your Initial Section:
- For a single braid: Take a triangular section of hair from the very top of your head (forehead to crown), about 2-3 inches wide. The cleaner this section, the neater your braid will look.
- For double braids: Take a similar triangular section from one side of your part.
- Divide and Conquer: Split this initial section into three equal smaller strands: a left strand, a middle strand, and a right strand. Hold them clearly separated with your fingers.
- Begin the Basic Braid (First Crosses):
- Cross Right Over Middle: Take the right strand and cross it over the middle strand. The original right strand is now in the middle position.
- Cross Left Over Middle: Take the left strand and cross it over the new middle strand. The original left strand is now in the middle position. You've completed one full basic braid cycle.
At this point, you should be holding all three strands in one hand (typically your dominant hand, but feel free to switch based on comfort). Your fingers should keep them separated – often pinky holding one, middle finger holding another, and index finger holding the third, or similar.
- Introduce New Hair (The French Braid Magic): This is the crucial step that distinguishes a French braid from a regular three-strand braid.
- Add to the Right Strand: Before crossing the *new* right strand (which was previously the middle strand), use your free hand (the one not holding the main braid) to pick up a small, even section of loose hair from the right side of your head, adjacent to your initial braid section. Add this new hair to your existing right strand, making it thicker.
- Cross Right (with added hair) Over Middle: Now, take this combined, thicker right strand and cross it over the middle strand.
- Add to the Left Strand: Repeat the process on the left side. Use your free hand to pick up a small, even section of loose hair from the left side of your head. Add this new hair to your existing left strand.
- Cross Left (with added hair) Over Middle: Take this combined, thicker left strand and cross it over the new middle strand.
You've now completed one French braid cycle, incorporating new hair from both sides.
- Continue Incorporating and Braiding: Shift your hands as needed to maintain a comfortable grip. Continue repeating step 4:
- Pick up new hair from the right, add it to the right strand, and cross over the middle.
- Pick up new hair from the left, add it to the left strand, and cross over the middle.
Work your way down your head, picking up new sections of hair from each side with every cross. Try to keep the sections of added hair consistent in size to ensure a smooth, even braid.
- Finish with a Standard Braid: Once you've incorporated all the loose hair from the sides of your head (usually when you reach the nape of your neck), continue braiding the remaining three strands as a regular three-strand braid until you reach the ends.
- Secure Your Braid: Fasten the end of your braid securely with a hair elastic.
Pro Tips for Mastering Your Own French Braid
Learning how to French braid your own hair is a journey, not a sprint. Here are some insights to help you perfect your technique:
- Practice Makes Perfect: Don't get discouraged if your first attempts aren't flawless. Braiding your own hair requires muscle memory and coordination. The more you practice, the more natural it will feel.
- Mirror, Mirror: Using a hand mirror in conjunction with a wall mirror can be incredibly helpful, especially when working on the back of your head. This allows you to see your progress and correct any unevenness.
- Consistent Tension: Maintaining even tension throughout the braid is crucial for a neat and polished look. If some sections are too loose and others too tight, the braid will appear lumpy. Aim for firm but comfortable tension.
- Finger Placement: Your fingers are your tools. Learn to hold the three strands clearly separated while using your other fingers to smoothly pick up new sections of hair. This skill improves with practice. For more detailed insights on maintaining perfect grip, check out our article: French Braid Your Own Hair: Pro Tips for Perfect Grip & Parts.
- Start High: When beginning your braid, especially for a single one, start as high up on the crown as comfortable. This ensures your braid starts neatly and allows for more hair to be incorporated, creating a fuller look.
- "Pancaking" for Volume: Once your braid is secured, you can gently pull on the loops of the braid from the outside edge. This technique, known as "pancaking," loosens the braid and creates a softer, fuller, and more voluminous appearance.
- Address Flyaways: A light mist of hairspray or a touch of edge control can tame any unruly flyaways around your hairline and along the braid for a super sleek finish.
- Experiment and Have Fun: Once you've mastered the basic French braid, don't hesitate to experiment with different starting points, braid sizes, or even adding accessories like ribbons.
Mastering how to French braid your own hair is a rewarding accomplishment that opens up a world of styling possibilities. This classic, versatile, and protective hairstyle is well worth the effort of learning. With consistent practice, patience, and these detailed steps and pro tips, you'll soon be able to create stunning, salon-worthy braids right at home. So grab your comb, a mirror, and get ready to transform your look – compliments guaranteed!
