Unlock the Art of French Braiding Your Own Hair: Pro Tips for Perfect Grip & Parts
The French braid stands as a timeless emblem of elegance and versatility in the world of hairstyles. Far from being an intimidating feat reserved for professional stylists, mastering
how to French braid your own hair is an achievable skill that can transform your daily look. Whether your tresses are long and flowing, a chic short crop, boast a beautiful kinky-curly texture, or lay sleek and straight, this classic protective style offers a polished finish and helps maintain hair health. Despite its intricate appearance, the French braid is surprisingly approachable, requiring just a bit of patience and the right technique.
Learning to create this impressive look can take as little as an afternoon, and with the expert guidance of stylists like Bobby Tochterman and Robin Groover, you’ll soon be braiding with confidence and earning compliments. This comprehensive guide will not only walk you through the essential steps but also equip you with pro tips to achieve impeccable grip and razor-sharp parts, ensuring your French braids look flawless every time.
The Foundation: Prepping Your Hair for French Braid Success
Before a single strand is woven, proper hair preparation is paramount. This crucial first step lays the groundwork for a smooth braiding process, enhancing grip, reducing frizz, and promoting the longevity of your style. Think of it as preparing your canvas before painting a masterpiece.
*
Product Power: To give your strands the necessary grip and smoothness, a bit of product goes a long way.
*
Leave-in conditioner or mousse is excellent for smoothing the hair shaft and adding subtle hold, making it easier to manage and less prone to slipping. This is especially vital for those with fine, straight hair, where natural texture might be lacking.
* For a more tenacious hold, particularly on "shampoo day" hair that can be excessively soft and slick, a light spritz of
hairspray or texture spray can provide the perfect amount of tackiness. Avoid overdoing it, as too much product can make hair sticky and difficult to work with.
*
Targeted Application: The length of your intended braid dictates where to focus your product application.
* For
shorter braids, concentrate product primarily near the roots and top sections to prevent unraveling and maintain structure.
* For
longer braids, ensure product is also distributed through the mid-lengths and ends. This not only aids in grip but also helps protect the hair from splitting and keeps the ends looking neat.
*
Texture-Specific Tips:
* If you have beautifully
tight curly or coily hair, you might find that gently blowing your hair out beforehand can simplify the braiding process by reducing shrinkage. This isn't a strict requirement, as braiding textured hair in its natural state is absolutely possible and stunning, but it can make the sectioning and weaving feel less challenging for beginners.
* For those with
fine or slippery hair, consider applying a small amount of dry shampoo at the roots for extra texture and grip, even on clean hair. This can prevent strands from sliding out as you braid.
Charting Your Course: Deciding on Your French Braid Style
The beauty of the French braid lies in its adaptability. Before you begin weaving, consider the final look you envision. The number of braids you choose and how you part your hair will significantly impact the overall aesthetic.
*
Number of Braids:
*
Single Braid: For a classic, elegant look, a single French braid down the back is a go-to. To achieve this, Bobby Tochterman advises taking a central section of hair from the forehead straight back to the crown. This section will form the starting point of your braid.
*
Double Braids (Pigtails): If you prefer a playful yet chic style, two French braids are ideal. For this, part your hair either directly down the middle or with a low side part, dividing your hair into two distinct sections. Each section will then become its own French braid. You can explore variations like
Master French Braids: Easy Steps for All Hair Types & Lengths for more ideas.
*
Size Matters: Robin Groover highlights how braid size influences the outcome:
*
Large braids tend to give a fuller, more relaxed, and voluminous appearance.
*
Small to medium braids result in a tighter, more intricate look with less frizz, offering a sleeker finish. Experiment to find which size best complements your hair density and desired style.
*
Achieving Super Sharp Parts: A clean, defined part elevates the entire hairstyle. Groover's "secret weapon" for a super sharp part is to trace the intended line with a small amount of
gel or edge control. This not only defines the part but also adds a glossy finish, making your French braids look meticulously crafted. Use a rat-tail comb for precision.
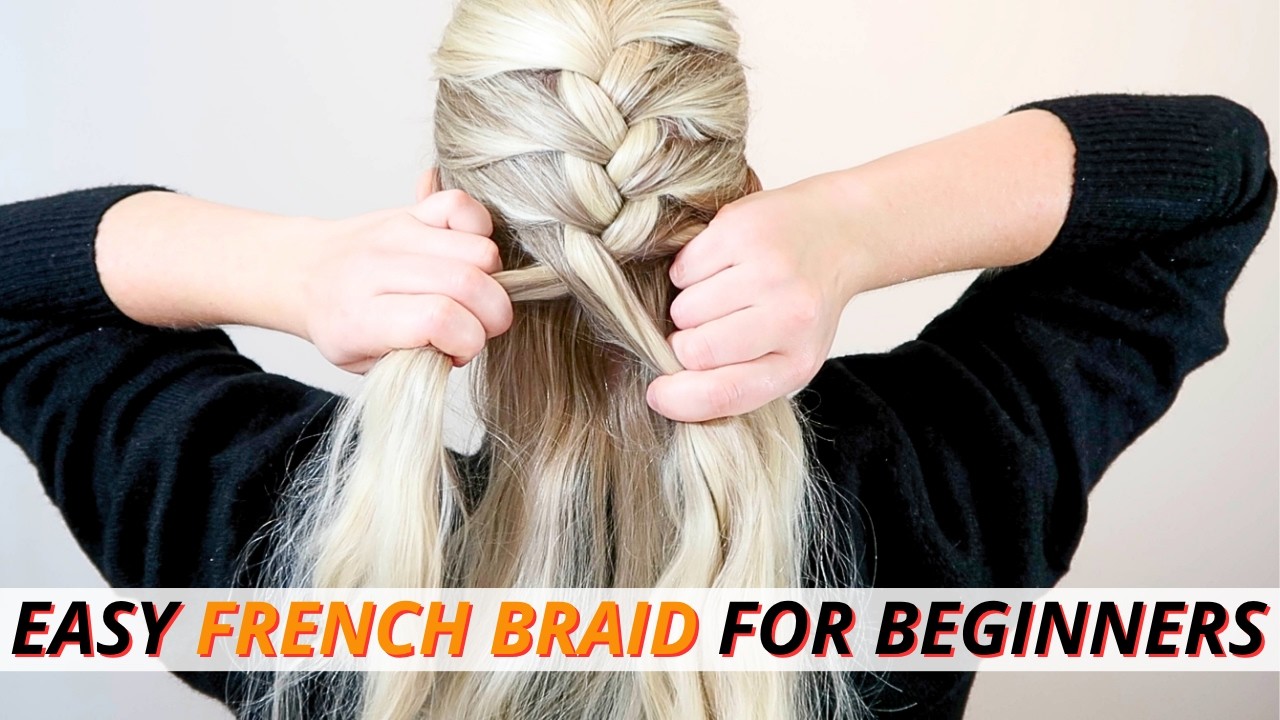
The Core Technique: A Step-by-Step Guide to French Braiding Your Own Hair
Now for the main event – the weaving itself. This step-by-step breakdown focuses on the mechanics, emphasizing grip and consistent parts. Remember, the same technique applies whether you're creating one braid or multiple.
1.
Initial Sectioning: Begin by taking a small, triangular section of hair from the top of your head (the starting point you defined earlier). Divide this section into three equal strands: a left, a middle, and a right strand. The size of this initial section will dictate the tightness and starting point of your braid. Smaller sections at the start create a tighter, flatter braid.
2.
First Cross-Overs (Regular Braid Foundation):
* Take the
right strand and cross it *over* the middle strand. The original right strand is now in the middle position.
* Take the
left strand and cross it *over* the new middle strand. The original left strand is now in the middle position. You've essentially completed one pass of a regular three-strand braid.
3.
Consolidate and Prepare to Add Hair: Move all three strands into your *non-dominant* hand (e.g., your left hand if you're right-handed). Use your fingers to separate them: your pinky or ring finger might hold the left strand, your middle finger the middle strand, and your index finger the right strand. This frees up your dominant hand to gather new hair.
4.
Add Hair to the Right Section: With your dominant hand, pick up a small, even section of loose hair from the right side of your head, adjacent to your current braid and following your part line.
Crucially, add this new hair to the *rightmost* strand you are currently holding.
5.
Cross Over (Right Side): Once the new hair is incorporated into the rightmost strand, cross this combined, thicker right strand *over* the middle strand. The combined right strand now becomes the new middle strand.
6.
Add Hair to the Left Section: Repeat the process on the left side. With your dominant hand, pick up a small, even section of loose hair from the left side of your head, adjacent to your braid.
Add this new hair to the *leftmost* strand you are holding.
7.
Cross Over (Left Side): Once the new hair is incorporated into the leftmost strand, cross this combined, thicker left strand *over* the new middle strand. This combined left strand now becomes the new middle.
8.
Continue the Pattern: Keep alternating steps 3 through 7. Each time you cross a side strand over the middle, you should first gather a new, small section of loose hair from that side and incorporate it into the strand before crossing.
*
Pro Tip for Grip & Parts: Maintain *consistent tension* throughout the entire braiding process. Hold the strands firmly but comfortably. Use your free fingers to keep the parts clean and defined as you pick up new sections. Ensure the new hair sections you add are of similar thickness to maintain a uniform braid appearance.
*
Hand Position: Practice holding the three strands in one hand, separating them with your fingers. This dexterity is key to freeing up your other hand to pick up new sections of hair smoothly.
*
Mirror Use: Position yourself between two mirrors (or use a hand mirror) to see the back of your head, especially when you're starting out. This helps ensure your parts are straight and you're picking up hair evenly.
9.
Finish with a Three-Strand Braid: Once all the loose hair from your scalp has been incorporated into the French braid, continue braiding the remaining length of hair as a regular three-strand braid. Secure the end with a hair elastic.
Mastering the Art: Pro Tips for Seamless French Braids
Beyond the basic steps, these professional insights will help you refine your technique and achieve truly perfect French braids.
*
Even Tension is Your Best Friend: This cannot be stressed enough. Inconsistent tension will lead to a lumpy, uneven braid. Practice applying steady, gentle tension as you weave, ensuring each crossover feels similar in tightness.
*
Finger Dexterity is Key: The ability to hold and separate the three strands in one hand, while simultaneously picking up new sections with the other, is fundamental. Practice this movement even without braiding hair to build muscle memory.
*
Don't Be Afraid to Undo and Redo: Especially when learning, it's perfectly normal to start over if a section looks uneven or a strand slips. Persistence is key!
*
Start Small with New Sections: When adding new hair, begin with smaller, manageable sections. This makes it easier to keep the braid tight and uniform. As you gain confidence, you can slightly increase the size of the added sections.
*
Combatting Slippage: If your hair is very fine or slippery, a little extra texture spray or even a touch of gel on your fingertips can provide added grip. Work quickly but deliberately.
*
Pancaking for Volume: Once your braid is complete and secured, gently tug on the outer loops of the braid to loosen them and create a fuller, wider appearance. This "pancaking" technique adds volume and softness to the finished style.
*
Secure the Ends Properly: Use a durable hair elastic that matches your hair color. For an extra polished look, you can wrap a small section of hair around the elastic and secure it with a bobby pin.
Conclusion
Mastering
how to French braid your own hair is a truly rewarding skill that opens up a world of styling possibilities. From casual everyday looks to sophisticated special occasion styles, the French braid offers versatility, hair protection, and an effortlessly chic aesthetic. By prioritizing proper hair preparation, making thoughtful style choices, and diligently practicing the core weaving technique with a focus on consistent grip and clean parts, you'll soon be creating beautiful braids with ease. Embrace the journey, be patient with yourself, and enjoy the impressive, polished results of your newfound braiding prowess!